An iPad is disabled when you enter a wrong passcode 5 times in a row. Your childer may do it, you may do it but the who did it doesn’t really matter.
The ”iPad is disabled try again in x minutes” message appears on the screen and many people don’t know how to deal with it

But you don’t have to worry anymore because I will show you all the ways to unlock a disabled iPad without erasing your device.
Check out Free ways to iCloud unlock it through Apple Support
How to fix ”iPad is disabled” error
3 days ago, my nephew called me and told me (while crying) that his parents locked his iPad by accident. I explained to him the iPad passcode Unlock procedure an in a few minutes he was smiling again.
Keep in mind that Paul is 9 years old so if he can do it, you can do it.
No iCloud Unlock Hacks are involved, but you can find a few of them on this post.
Step 1: iPad is disabled – try again
First of all, the screen message has to do with how many times you have entered a wrong password.
- 5 incorrect passcode – iPhone is disabled, try again in 1 minute
- 7 incorrect passcode– iPhone is disabled, try again in 5 minutes
- 8 incorrect passcode– iPhone is disabled, try again in 15 minutes
- 9 incorrect passcode– iPhone is disabled, try again in 60 minutes
- 10 incorrect passcode– iPhone is disabled, connect to iTunes
It is not uncommon to remember the password after a while. In the first 4 cases, you will just have to wait and enter the correct passcode.
But if you totally forgot the iPad passcode or you already see the ”connect to iTunes” prompt, you must continue with this guide.
Also, since the iCloud Status is Clean, you can read more to the Unlock iCloud Clean mode post.
Step 2: Try to Backup and unlock your iPad without Reset
It is wise to backup your iDevice every now and then. I backup my iPad Air 2 every month just to be sure.
The problem when unlocking a disabled iPad via iTunes is that you will have to erase the iDevice. This is what Apple suggests after all.
- Launch iTunes
- Connect your disabled iPad device
- Look at the upper right corner and wait for your iPad to be found
- Click on it
- You have the option to restore a backup or setup as a new iPad
- Choose ‘Setup as new iPad’ and click restore
- Before the full restore and sync, the process will start with the iPad backup.
- CANCEL THE BACKUP IMMEDIATELY (click the small x in the status window)
- As soon as the backup is canceled, it will start syncing
- CANCEL THE SYNC IMMEDIATELY with the same x button
If you have done everything correctly, your disabled iPad will be unlocked without resetting and losing any data.
This disabled iPad Unlock method is not 100% guaranteed but I think you should try it a few times if you really don’t want to erase your data.
On the other hand, if you remembered your forgotten passcode you can try this:
- Connect your iPad to your computer
- Select your iOS Device
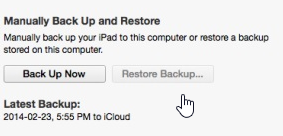
- Choose “Back Up Now”
- Enter your passcode to start syncing
- Cancel the backup or wait until it is completed (recommended)
It really doesn’t matter because your previously disabled iPad is now unlocked.
Step 3: Resetting a disabled iPad with a previous Backup
If you already made a previous backup then un-disabling your iPad is a piece of cake.
- Use the computer you last synced your iPad
- Open iTunes
- If the Sync procedure does not start automatically, choose Back Up now

- Wait until the backup is finished
- Select “Restore from iTunes backup”
- Wait until the restore is completed
All your documents are safe and your iPad is not disabled anymore.
Step 4: Restore the disabled iPad with the Recovery mode
I did everything I could to save your iDevice’s data. If you can’t remember the iPad password or there is no backup then you will have to erase your iPad and reset the passcode through the recovery mode.
- You can use any PC
- Launch iTunes
- Connect the USB cable to the computer but DO NOT connect the disabled iPad yet
- Turn off the iPad (Press and hold the Sleep/Power button)
- Press and hold the Home Button and connect your iPad to the PC. The iPad will turn on and soon after you will see the ”Connect to iTunes” screen (you need to keep holding Home Button)
- You will be alerted that iTunes has detected an iDevice in Recovery Mode
- Select OK and the Restore will start
- Follow whatever the Setup Assistant suggests
- In the end, you will get the “Set up your device” prompt. Do it
Your forgotten passcode iPad is now restored. Choose a new passcode and don’t forget it this time 😉
Leave a comment below if you know another way to unlock a disabled iPad without losing personal data or if you want help with one of these methods. Until next time, take care.

2 comments
You can use 3uTools to keep flashing the os on to the iOS device to get unlimited tries if you select “retain user data”. Helped me figure out my passcode with that without having to reset my iOS device
Hey GoldRush,
If you can provide us some screenshots with that, we will be happy to add it to our article here 😀